Vehicle and Props Design | Exercises
23.9.2024 - 17.11.2024 || Week 1 - Week 8
Yong Zhen Xing || 0359473
Vehicle and Props Design || Bachelor of Design (Honours) in Creative Media / Taylor's University
Exercises
Contents
1. Lectures
2. Instructions
Lectures
Week 1
This week, Mr.Kannan introduced us to what is to be expected in the entire duration of Vehicle and Props Design Module.
Week 2
This week, Mr.Kannan introduced us to what is to be expected in the entire duration of Vehicle and Props Design Module.
Week 2
In this week's lecture, Mr.Kannan showed us things we needed to consider when planning for our vehicle as well as our exercise for the week. There was also a short demo on a toilet transformed into a vehicle which was really cool.
fig 1.1, Lecture & Demo (3/10/2024)
Week 3
For this week, we were taught on values and lighting would work on objects. We were also told that if we struggled on sketching the vehicle, we should make a rough silhouette shape of the vehicle first and then only sketch over it. Lastly Mr.Kannan went over what should task should be done along with how to go about Project 1.
fig 1.2, Lecture & Demo (10/10/2024)
Week 4
In this week's class, Mr.Kannan showed us what we should consider on Project 1's proposal as well as a recap on what needs to be done. Then he showed a simple way on how to ideate multiple ideas from a base through silhouettes. Lastly he essentially showed the development process from Project 1 till the Final Project.
fig 1.3, Lecture & Demo (17/10/2024)
Week 5
In this week's class, Mr.Kannan goes in depth about form and function on a vehicle. He also showed how we could utlize Zbrush or Blender to better understand how perspective of your vehicle should be.
fig 1.4, Lecture & Demo (24/10/2024)
Week 7
In this week's class, Mr.Kannan touched on form and functions again as well as volume.
fig 1.5, Lecture & Demo (7/11/2024)
Week 6 - 15
From week 6 onwards, we had consultation every class where we slowly progressed on project 1 up to our final.
Instructions
In exercises, we needed to practice our fundamentals of vehicle and props design by drawing and sketching to better understand how shapes of vehicles looks like.
In the first class, we were to draw a subject matter of our choice in different perspectives to improve our understanding on perspective. I chose a mouse as my subject matter and sketch based on what I see.
As part of our requirement, we needed to deconstruct and reconstruct 15 vehicles from 3 different types which are land, water and air. Below are the sketches.
Below shows a lighting study that I did following Mr. Kannan's tutorial. He only showed the basic ball but we needed to do one for a metal one and glass one as well. I looked at references and a few tutorial videos to help me better understand the kind of lighting that will be cast on different types of object.
Fig 4.1, Different Lighting Study (17/10/2024)
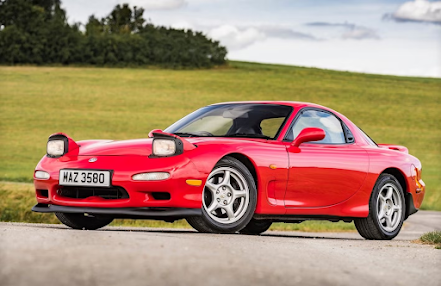
As part of our requirement, we were also to narrow down the 15 sketches previously and choose on a specific vehicle that we wanted to study. Below shows the car chosen and that is the Mazda RX7. I chose this car because I like how old school the car is with the pop-out lights.
I needed to understand the design of the cars first, so I did some research about the functions of the car and simplify it in the sketch below. Most of the functionality of the car is similar with other cars but with the difference of the car's dashboard and the pop-out light.
Fig 5.2, Form and Function Sketches (30/11/2024)
Then I sketch different perspectives of car. Even with reference, it was still tricky to get the perspective right, especially for the 3/4 angle.
Fig 5.3, Perspective Sketches (28/11/2024)
Next, was adding line weight to the 3/4 perspective car which was very straightforward.
Adding value and colour was honestly a challenge for me. I had issues trying to blend the darker and lighter areas which made the entire car seems like the same value. However I do think that in the end results were pretty decent. As for the colours, I selected colours that are common and would make sense for this specific car.
fig 6.1 Final Exercise (30/11/2024)
Reflection
My Other Vehicle and Props Design Work :
.png)
.png)


Comments
Post a Comment